How to Move a Servo Using A Keyboard
Recently I am playing with Arduino because I need to prototype some virtual reality thing in reality (I can’t resist!). I am absolutely zero in hardware, so I’ll just as well document it here for my own reading.
What’s that servo thing in the title?
A servo
One component is the prototype is that there are movable components. How do you move something programmatically? In robotics, you get this nifty thing called the servo. A simple servo is just a small component that can move in 1d direction. So if you ask it to rotate to some angle at 30 degrees, or 110 degrees, you can just give it an analog signal to do it. Of course, analog signals are not precise, so it may end up at 29 degrees or 108 degrees.
It has three wires: Generally a red wire which is the power, a yellow/white wire which is the signal, and the brown/black wire which is the ground. We’ll need to connect these wires to the Arduino board.
You can screw something onto the servo, so that thing will move along with the servo. For example, it is common to tie some “hands” to the servo which will serve as a robot’s hand.
How to control a servo?
A servo is generally analog, so you need to use an Arduino board to control it. Arduino can take digital input (computer) and output analog signal to control analog components (servo). Here is how an Arduino board Meta 2560 looks like:
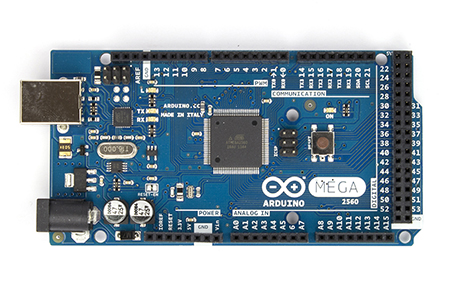
You will need to connect the servo power to the 5V pin, ground to the GRD pin, and the signal wire to pin 9. Why pin 9? Because the program I wrote assume it is pin 9.
Then, you need to upload this program to the Arduino board using the Arduino IDE:
// This program demonstrates how to control a servo to move in either direction
// with the keyboard.
//
// Setup:
// - Power (RED) to 5V. Ground (BROWN) to GRD/GRC. Signal (YELLOW) to pin 9.
// - Upload this program to Arduino and connect Servo to board.
// - Download Putty. (http://www.chiark.greenend.org.uk/~sgtatham/putty/)
//
// Usage:
// - Open putty, connect to the COM port.
// - Input a series of 'e' and press ENTER.
// - Input a series of 'd' (or other char other than 'e') and press ENTER.
// - You should see the servo move in either direction depending if the char
//   is 'e' or non-'e'.

// Ref: http://arduino.cc/en/reference/servo
#include

Servo servo;

int pos = 0;  // Stores the position (angle) of the servo. Range is [0, 180].

void setup()
{
  Serial.begin(9600);
  servo.attach(9);  // Attaches the servo on pin 9 to the servo object.
  servo.write(0);  // Resets the position.
}

void loop()
{
  if (Serial.available()) {  // Returns true if there is serial input.
    char ch = Serial.read();

    if (ch == 'e') {
      // Make sure not to exceed the mechanical limitation.
      if (pos < 180) {
        pos += 1;
      }
    } else {
      // Make sure not to exceed the mechanical limitation.
      if (pos > 0) {
        pos -= 1;
      }
    }

    // Now ask the servo to move to that position.
    servo.write(pos);
    // Mechnical limitation to the frequency of commands given.
    delay(50);
  }
}
Basically, what the program does is that if a char ‘e’ is received, it will move the servo in one direction, and other chars will move the servo in another direction.
Once the program is uploaded to Arduino, you should open Putty and connect to the serial port, and then start to press a series of ‘e’ and then ENTER, and other chars will reverse the servo.
There! Your first movable component at the command of your finger tips!
Source code is on github here.