Build Your Own Real Time Traffic Data Feed
Earlier someone asked me about if it is possible to build a real time traffic data feed straight from traffic cameras. This is my brief investigation. Also, this is the first time I ever do computer vision. Enjoy the adventure!
What is a Real Time Traffic Map?
On a high level, a real time traffic map is composed of two parts:
- A real time data feed of the vehicle speed of a road segment.
- A user interface presenting the information in 1) , which is usually a map like this below.
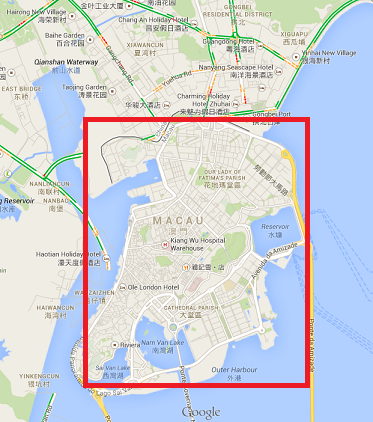
Inside the enclosed red rectangle, there are no green/yellow/red roads indicating traffic status. Outside of the rectangle, there’s green/yellow/red roads which indicate current traffic status.
This little city of Macau enclosed in the red rectangle is one of the unfortunate places on Earth where Google Maps do not offer real time traffic map as of this writing. The Macau government does not offer any real time traffic data feed. Without the traffic data feed, you cannot really do the traffic map.
So, how about we do something about the real time traffic data feed?
What does a Traffic Data Feed Look Like?
A real time traffic data feed generally gives you these information, and is updated periodically:
- Coordinates describing the start to the end of the road segment
- Average traffic speed or travel time for the road segment
- Current traffic speed or travel time for the road segment
So if the current traffic speed is a lot lower than the average traffic speed, you know it is having a traffic jam. If there is a major accident, the current traffic speed will probably drop to very low. The journey time data feed in UK does something similar. Bolded the interested areas below:
<elaboratedData id="GUID-1080026-10130">
  <sourceInformation>
    <sourceCountry>gb</sourceCountry>
    <sourceIdentification>10130</sourceIdentification>
    <sourceName>
      <value lang="en">NTCC</value>
    </sourceName>
  </sourceInformation>
  <basicDataValue xsi:type="TravelTimeValue">
    <time>2014-03-09T03:35:00Z</time>
    <affectedLocation>
      <locationContainedInGroup xsi:type="LocationByReference">
        <predefinedLocationReference>Section10130</predefinedLocationReference>
      </locationContainedInGroup>
    </affectedLocation>
    <travelTime>287.0</travelTime>
    <freeFlowTravelTime>246.0</freeFlowTravelTime>
    <normallyExpectedTravelTime>262.0</normallyExpectedTravelTime>
  </basicDataValue>
</elaboratedData>
What About Macau?
The Macau government does not offer any real-time API of the road traffic, however they do offer real time traffic cameras for some of the roads. The cameras are colored at a 352 x 288 resolution. It updates every 3 seconds. So, technically, it is an image sequence and not a video feed. You can simply write a script to pull image data off the cameras every 3 seconds.
How Do You Build a Traffic Feed From a Traffic Camera?
It is not an easy task to calculate the current traffic speed from a image sequence. However, we could try something that might yield potentially good results: counting the number of cars on the road. The intuition is that if there are many cars, the traffic is probably bad. If not, the traffic is probably good. Note that this varies from cameras to cameras, and also, traffic red lights could cause false positives. But let’s deal with those cameras that aim at the bridges like this one:

OpenCV library is an excellent starter for any generic computer vision tasks. I used the Python-OpenCV wrapper for it. We will use the Haar cascade classifier in OpenCV (see my earlier post of the idea) to perform the car detection, using this exported model cars3.xml as a quick starter which is already trained to detect cars in images.
Directly applying the the model onto our image gives this result:
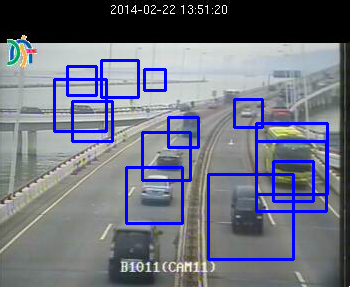
For our first attempt, the detection on the top left seems to be just plain wrong, and we also the small van at the bottom-most. We can do better. Let’s tune our model parameters.
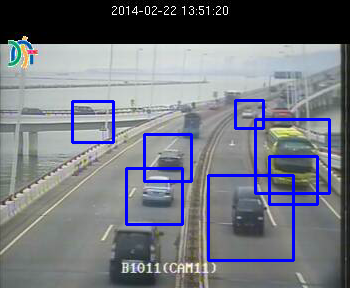
Better, the top left detection looks more reasonable. We can play with the model parameters to get more optimal results. But before that, we know that the sea, the black areas are probably useless, so let’s just crop them away during the car detection phase.
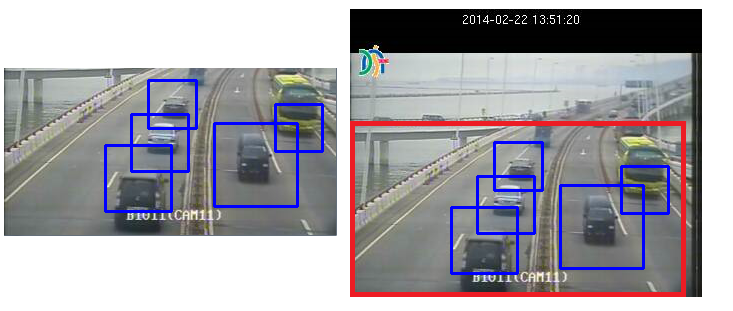
Directly applying car detection on the near roads gives a much better result!
With the car count, we can now build a model that tries to evaluate something like given 5 images in a road for the past 15 seconds, and the number of cars in each image, is it a 1) heavy traffic, 2) mid traffic, or 3) low traffic? This is future work which I will not go through here.
Things to Know Too!
This post is overly simplified! It is not that easy, really. For these reasons and many more:
- The models might perform well on daytime, but night time could be bad. Initial results suggest that the cars3.xml model performs poorer for night time car detection.
- The traffic camera might be not pointing perpendicular to the road, causing car detection to be less accurate.
- Red lights. Some of these cameras cover red lights. Red lights causes car counts to build up, but are they definitely a sign of poor traffic? It may not be.
- Occlusion. Cars overlapping might cause data to be skewed. We might want to train our model to handle this.
- cars3.xml model does not detect motorbikes at all.
Source Code and Run It Yourself
Here is the source code that runs through source images, which I included some sample images already. You will need OpenCV and Numpy, which you can download here (excellent link!) for Windows users. For linux users, just pip install it. You will have to collect images yourself.
To run the script, just do this:
python detect_cars_in_image_seq.py
I also pasted the source code here for reference.
"""
Author: Eric Chio <ckieric[at]gmail[dot]com>
Date: 2014/03/08
Project: Macau Real Time Traffic Data Feed
Website: /

Idea:
- Loads an image sequence
- Crop the image to only areas of interest (no sea, just roads, and nearby
roads)
- Create a cascade classifier with cars3.xml
- Use cascade classifier to detect cars, tune parameters accordingly.

Note, cars3.xml do not detect motorbikes.
"""

import numpy as np
import cv2

# Loads the data as a VideoCapture format, which is really just
# an image sequence.
image_sequence = 'Data/Camera3/image_%05d.jpg'
cap = cv2.VideoCapture(image_sequence)

# Load our cascade classifier from cars3.xml
car_cascade = cv2.CascadeClassifier(r'cars3.xml')

# Reduce frame number of tests.
number_of_frames_to_load = 30
for frame_id in xrange(number_of_frames_to_load):
    ret, image = cap.read()

    # Crop so that only the roads remain, eliminates the distraction.
    image = image[120:,:-20]

    # Use Cascade Classifier to detect cars, may have to tune the
    # parameters for less false positives.
    cars = car_cascade.detectMultiScale(image, 1.008, 5)
    for (x,y,w,h) in cars:
        cv2.rectangle(image,(x,y),(x+w,y+h),(255,0,0),2)

    print 'Processing %d : cars detected : [%s]' % (frame_id, len(cars))

    cv2.imshow('frame', image)
    cv2.waitKey(300)

cap.release()
cv2.destroyAllWindows()