What is Motion-To-Photon Latency?
The term “motion-to-photon latency” comes up a lot when talking about virtual reality. What is that?
Definition
Motion-to-Photon latency is the time needed for a user movement to be fully reflected on a display screen. If it takes 100ms to reflect your movements on the screen of your virtual reality headset when you make a movement (e.g. look to the left), the 100ms is the motion-to-photon latency.
Why is this important?
Everyone emphasize the importance of motion-to-photon latency. There are two major reasons why this is so:
- Low motion-to-photon (< 20ms) latency is necessary to convince your mind that you’re in another place (Presence). This is also called presence. Presence is the state in virtual reality that you feel you’re in the simulated world. To achieve presence, one of the requirements is low latency. This means a motion-to-photon latency of < 20ms.
- A high motion-to-photon latency makes a poor virtual reality experience (motion sickness and nausea). When a user makes a movement wearing the VR headset, the mind expects the screen to be updated correctly to reflect that action. When the screen lags behind the user movement, the user can experience disorientation and motion sickness. This completely breaks the VR experience for the user.
How do you improve that?
Since a high motion-to-photon latency could induce motion sickness and nausea, and a low motion-to-photon latency (< 20 ms) is a necessary condition for presence, it makes sense to minimize the motion-to-photon latency. To know how we can improve motion-to-photon latency, we need to know what makes up this number.
To improve motion-to-photon latency, every component in the motion-to-photon pipeline needs to be optimized. For a movement to be reflected on the screen, it involves the head mounted display, connecting cables, CPU, GPU, game engine, display technology (display refresh rate and pixel switching time). This is not exhaustive and there are probably some more bits in the list, but includes the major elements. I’ll go through some of the common techniques to decrease the motion-to-photon latency.
Display Technology
Pixel Switching Time
Pixel switching time is known as the time needed to update all the pixels on the display. For an image to be seen on the display, it has to be drawn. To draw the image means each pixel on the display has to be updated to reflect that image. This is best illustrated as follows:
![]()
In this example, the pixel switching time for this (3 x 3) display is 3ms. This is because it takes 1ms to update one line of pixels and 3 updates to update the whole display.
LCD displays have poor pixel switching time. Currently the headset Oculus Rift and many smartphones that you can use with Google Cardboard are LCD displays. Other technologies like OLED provide almost instantaneous response time.
To decrease pixel switching time, use a faster display technology that has faster pixel switching time. For instance, we can cut down on the latency if OLED is used instead of LCD displays.
Refresh Rate
The refresh rate is the frequency the display fetches a new image to be drawn from the graphics card, which determines how long the latency to wait between each image. For a 60Hz display, the latency is calculated as (1000ms / 60Hz =) 16.67ms. This means even if the image takes zero latency to be drawn at the graphics card, and have zero pixel switching time, the image can only be updated as fast as 1 image every 16.67ms.
To decrease latency of getting an image, a higher refresh rate display is needed because latency (ms) = 1000ms / refresh rate (Hz). For instance, a 120Hz will decrease this latency to 8.33ms.
Host Level (CPU, GPU, Game Engine)
The host level offers a lot of potential to improve the motion-to-photon latency. John Carmack has written an excellent article about how to reduce latency on the host level, mainly focusing on the CPU, GPU, and rendering techniques. This original article is no longer available but can still be found in the archive. Before we go deeper, a little background information will help a lot.
The classic processing model for a game or VR application is:
- Read user input (I)
- Run simulation (S)
- Issue rendering commands (R)
- Graphics drawing (G)
-
Wait for Vsync (The ‘ ’) - Scanout (V)
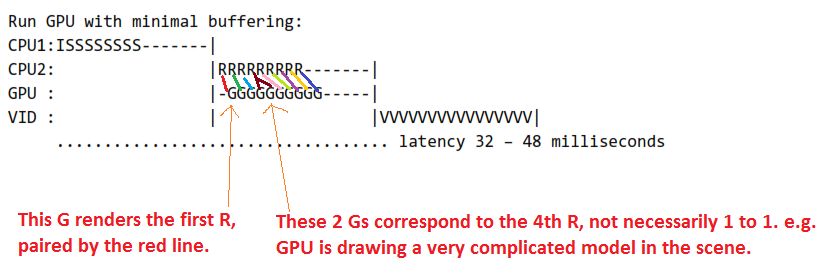
A sample pipeline may look like this below. CPU1 reads user input and run simulation, CPU2 issues rendering commands, GPU draws the scene and converts to drawing commands to display, and write it to display to be screen (V, the scanout).
| Each frame (each interval between the ‘ | ’) takes 16ms. The whole rendering took 4 frames, so the pipeline took at least 48ms ~ 64ms. |

Courtesy of John Carmack from “Latency Mitigation Strategies”
With this in mind, let’s go through some of the more important techniques in the article.
Prevent GPU Buffering
Prevent GPU buffering decreases latency by having the GPU start drawing (G) after receiving issuing the rendering commands (R), rather than waiting for all the rendering to be completed. Following the example above, a frame can be saved using this technique (reducing 16ms latency). Illustrated as follows:
My edits on original. Original source courtesy of John Carmack from “Latency Mitigation Strategies”.
You might ask: Why the GPU can start drawing without waiting for the CPU to finish issue rendering commands?
Well, the GPU has to wait. That is why the (G) above happens one frame later than the (R). However, once the GPU received the first rendering command, it can immediately start drawing to the display. An example can explain this. Consider a scene where a leaf is falling off a tree.
- CPU calculates the scene containing the tree and leaf.
- CPU asks GPU to draw the scene at 1).
- GPU takes scene at 1) and starts converting the scene to drawing commands and write to display.
- Before GPU is done at 3), CPU calculates the next scene of how the leaf is falling off in the air, and sends this scene to GPU to be drawn.
- GPU takes scene at 4) and starts converting the scene to drawing commands and write to display.
- …
In this way, even though the GPU drawing work could take a long time, the next scene that the CPU is calculating is independent of the GPU drawing activity.
This is an over-simplified understanding of how things work, but should give a high level idea. Note that this technique can have more dropped frames during heavily loaded situation.
Timewarping (a.k.a. Asynchronous Timewarping or ATW)
Timewarping reduces the perceived lag from reading user input to seeing an updated image on display screen. It does so by just calculating an update of a scene mathematically bypassing all the heavy CPU and GPU work, which is very slow. For certain actions such as the user looking slightly to the left, the change to the scene is very small. What timewarping does is just before rendering, it takes the current image displayed and the most recent input from IMU (inertial measurement unit) and apply a mathematical transformation to get the updated image that reflects the user action. The pipeline looks like this:
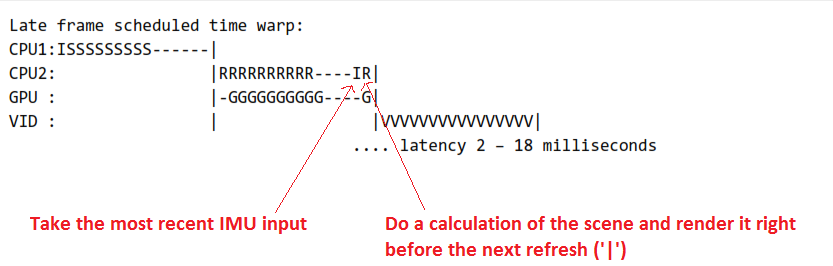
My edits on original. Original source courtesy of John Carmack from “Latency Mitigation Strategies”.
This process is extremely fast (multiplying matrices) compared to issuing rendering commands and doing all the graphics drawing. As long as the action is not complicated, the calculated scene resembles closely to the actual scene calculated from the heavy work done by the CPU and GPU. This technique can introduce artifacts especially when there are other effects such as smoke, but is still generally acceptable to the user of the virtual reality headset.
Bonus: Head Tracking
This only applies in virtual reality headsets that tracks head movements like Oculus Rift, but not Google Cardboard or Gear VR. Head tracking is used to track a user’s head movement as another form of user input (e.g. head forward => move forward).
Predicting Head Movement
This technique works by predicting the user head movement earlier correctly and react to this movement, thus decreasing the time used in taking user input in the motion-to-photon pipeline. Oculus Rift takes about 80ms~90ms to track head movement and respond to it, and down to about ~50ms with predictive head tracking. However, if the prediction is wrong, it can increase latency and render incorrectly causing more nausea to the user.
Conclusion
By now, I hope that you have a better idea of what motion-to-photon latency is and why this is important. You also learnt how to contributes to this latency and some techniques that decrease the number. The motion-to-photon latency is very critical to a quality VR experience. I think is also the hardest one we have to solve before achieving presence. Let’s look forward to what will come to us in 2015 and onwards!
References:
- http://www.altdev.co/2013/02/22/latency-mitigation-strategies/
- https://www.oculus.com/blog/details-on-new-display-for-developer-kits/
- http://dsky9.com/rift/presence-technical-requirements/
- https://www.oculus.com/blog/asynchronous-timewarp/
- http://www.digitaltrends.com/home-theater/oled-vs-led-which-is-the-better-tv-technology/